Follow this monthly column to get the most out of your digital camera. Here you will learn how to take your photography from OK to OMG! Once you learn the camera’s technical aspects, we will cover how to see creatively and let out the real photographer in you.
This month – make your photos stand out by using Depth of Field to control what the viewer sees.
Sometimes referred to as Depth of Focus, Depth of Field (DOF), is a measure of how much of your scene is in focus. Large apertures produce photos with shallow DOF, while small apertures are used for when you want to get everything in focus.

Range of aperture sizes.
Aperture is the size of opening in the lens that lets light into the image sensor. Apertures are in f-stops. Depth of Field is mostly controlled by aperture, and to a lesser extent by the distance in front of and behind the subject. We can take a deeper dive into that in other columns.
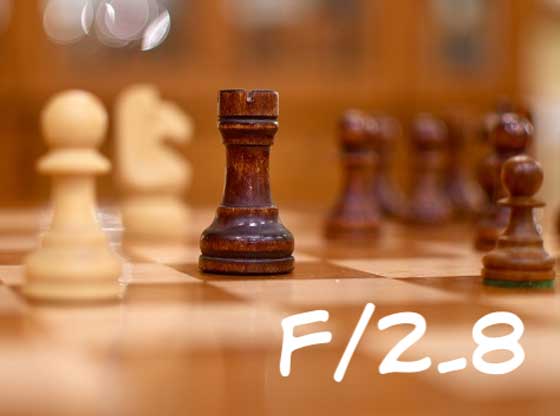
Use an f-stop like 2.8 if you want the subject to be in sharp focus while the background is blurred like the feature photo of this article. On the other hand, f/22 will make more of the photo in focus, from foreground objects to the background. Check out the examples of the chess pieces.
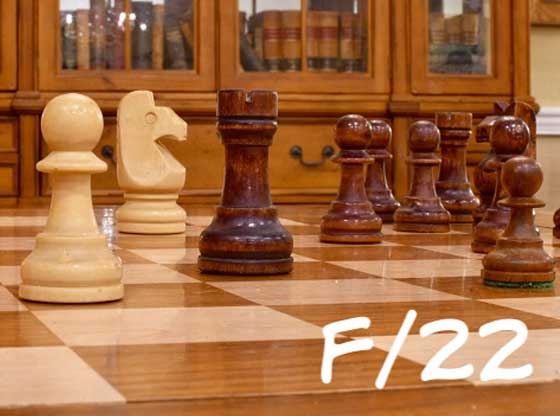
Chess board pieces taken at Pinehurst Hotel illustrating Depth of Field.
When taking photos, you often want to bring attention to the subject by making it in sharp focus and getting the background soft and blurry. Other times you want to keep more of the image sharp. Understand apertures and Depth of Field is the secret.
Last month, we talked about using Aperture Priority Mode. Modern digital cameras have a shooting mode dial that lets you decide between Full Automatic, Shutter Priority, Aperture Priority or Manual Mode.
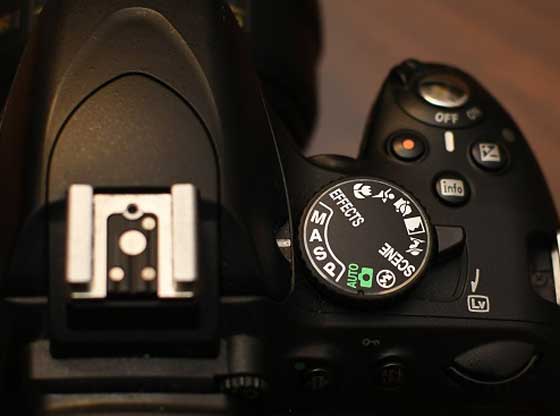
Camera mode dial.
We will go in-depth on each mode in future columns, but for now I encourage beginning photographers to shoot in Aperture Priority Mode when outdoors in daylight and learn to use Exposure Compensation.
In Aperture Priority Mode, you set the aperture, and your camera will pick the shutter speed to get the correct exposure. You control the amount of light that lands on the image sensor by adjusting the size of the aperture. Look in your camera manual to find the dial that controls aperture.
Experienced photographers sometimes say, “I shoot wide open”, or ‘that was stopped down.” What they mean is, they controlled the aperture to get the photo they wanted.
When you shoot “wide open”, your camera’s lens lets in as much light as it can. On the other hand, “stopped down” is when you choose an aperture that lets very little light hit the sensor. Don’t get confused with the f-stop numbers. f/2.8 is actually a large diameter aperture, while f/22 is a small diameter opening.
Not all lenses are made the same. You may not be able to open up to f/2.8 on the lens you have. Check the numbers of the side of your lens to determine the maximum f-stop. Some zoom lens may have a variable aperture, for example f/3.5 – f/5.6.
So, what happens when you take a photo and it is too dark (underexposed) or too light (overexposed)?
Enter Exposure Compensation
Most camera have a button with a +/- symbol on it. It allows you to adjust the exposure of your next photo by either increasing or decreasing the amount of light hitting the sensor. Exposure Compensation is measured in stops. For example, a +1 Exposure Compensation doubles the amount of light recorded by the sensor, while -1 halves the amount of light.

The exposure compensation button allows you to adjust the exposure of your next photo by either increasing or decreasing the amount of light hitting the sensor.
One thing to remember, set the Exposure Compensation back to Zero after you finish taking photos of the scene, otherwise your next set of shots will not have the proper exposure.
Back to Aperture Priority Mode
For now, practice by settings your camera to Aperture Priority Mode and changing the aperture to control the Depth of Field in your photo. Remember, when Shooting in Aperture Priority Mode, you set the f-stop and the camera adjusts the shutter speed to get the proper exposure.
Controlling the Depth of Field is key to taking fabulous photos – ones you will be proud to print and hang on your wall.
In next month’s column, we will cover the Exposure Triangle and how the camera balances Aperture, Shutter Speed and ISO to produce an image. Master the Exposure Triangle and your photography skills will soar.
Written and photos by John Patota who is a photographer for Sandhills Sentinel and instructor of photography, offering practical advice on his Photo Walks and Workshops. Visit JohnDPatota.com to learn more.